Please consider the environment before printing this document.

If for any reason parts of this translated document are not clear, please email us your questions so we can clarify any confusion.
Welcome to the future of forms and manuals an online translation service facilitated by Google. This document may be updated without notice to provide late edits, should any be necessary. If you prefer a printed copy you will need a printer connected, press print at the top of the page and follow the prompts, alternatively, if you prefer a PDF file emailing please request one; our service email address Contact@Deskcycle.eu or Customer Support.
Safety Precautions
Safety
Warning! To reduce the risk of injury or damage to the DeskCycle2, please read the following safety precautions before using the DeskCycle2.
• After unpacking if anything is missing or broken please email us with your name, contact details and order number (See contacts details at the end of this manual). If possible we will send the part by the next available delivery service. If this is not possible return the DeskCycle2 to your retailer for a refund.
• Read all instructions in this manual before using the DeskCycle2. Use the DeskCycle2 only as described.
• It is the responsibility of the owner to ensure that all users of the DeskCycle2 are adequately informed of all precautions.
• Never use this device after drinking alcohol; doing so is dangerous and could result in serious injury or accident.
• Do not place this device in a location where it may cause an obstruction. Do not leave the device unattended after use. Be sure to move and store it in a safe place to avoid injury.
• Use the DeskCycle2 indoors on a level surface. Keep the DeskCycle2 away from moisture and dust.
• Make sure that the pedals are on tight. Loose pedals will slowly become undone. Using the bike with loose pedals can damage the threads on the crank arms. Stripped crank-arm threads are not covered by the warranty.
• The DeskCycle2 is precision made and should not be dropped on hard surfaces
• Disassembling or modifying DeskCycle2 will void the warranty.
• The DeskCycle2 has sealed bearings which do not require lubricating.
• Do not place the bike in a location where it will be in contact with direct sunlight or where it will be exposed to high temperatures, excessive humidity or damp.
• Do not stand on the pedals. The DeskCycle2 was not designed to be used while standing.
Consult Your Physician
It is always important to consult your physician before starting an exercise program. This is particularly true if any of the following apply to your current medical condition:
• Chest pain or pain in the neck and/or arm
• Shortness of breath
• A diagnosed heart condition
• Joint and/or bone problems
• Currently taking cardiac and/or blood pressure medications • Have not previously been physically active • Dizziness or blurred vision • Those with physical handicaps should use this device only under supervision.
If none of these apply to you then start gradually and sensibly. However, if you feel any of the physical symptoms listed above when you start your exercise program, contact your physician right away. If one or more of the statements listed above applies for you, see your physician before beginning an exercise program. An exercise-stress test may be used to help plan your exercise program.
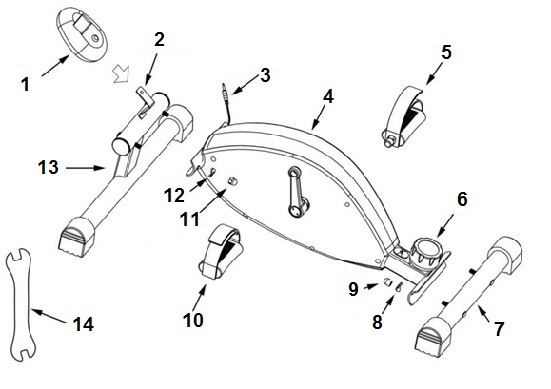
Assembling your DeskCycle2
| Part Number |
Part Name |
| 1 |
Display |
| 2 |
Display Brackett |
| 3 |
Connector |
| 4 |
Bike |
| 5 |
Right Pedal |
| 6 |
Resistance Control Knob |
| 7 |
Small Leg |
| 8 |
Washer |
| 9 |
Nut |
| 10 |
Left Pedal |
| 11 |
Nut |
| 12 |
Washer |
| 13 |
Large Leg |
| 14 |
Tool |
|
 |
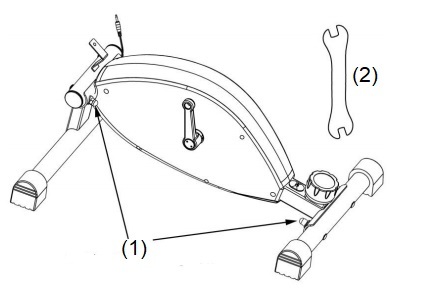
Step 1: Install the Large Leg
Remove the nuts and washers from the Large Leg. Align the bolts of the Large Leg with the holes in the Bike, and push the bolts through the holes. Attach a washer and a nut to each bolt. Do Not tighten the nuts until step 3. |
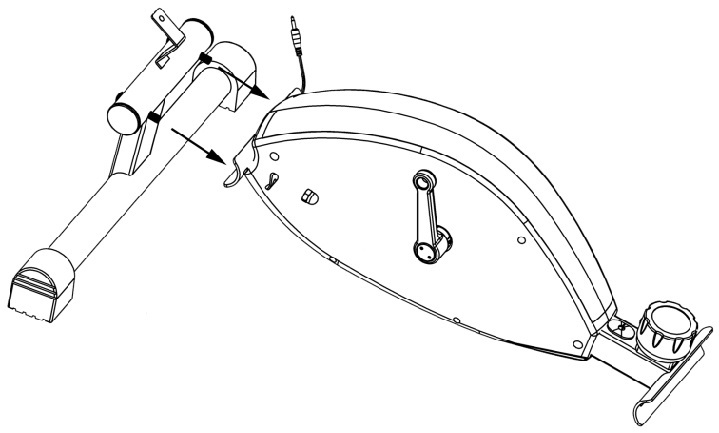 |
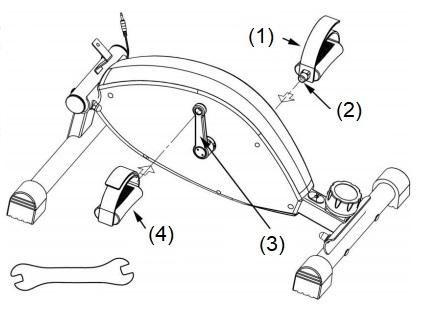
Step 2: Install the Small Leg
Remove the nuts and washers from the Small Leg. Align the bolts of the Small Leg with the holes in the Bike, and push the bolts through the holes. Attach a washer and a nut to each bolt. Do Not tighten the nuts until step 3. |
 |
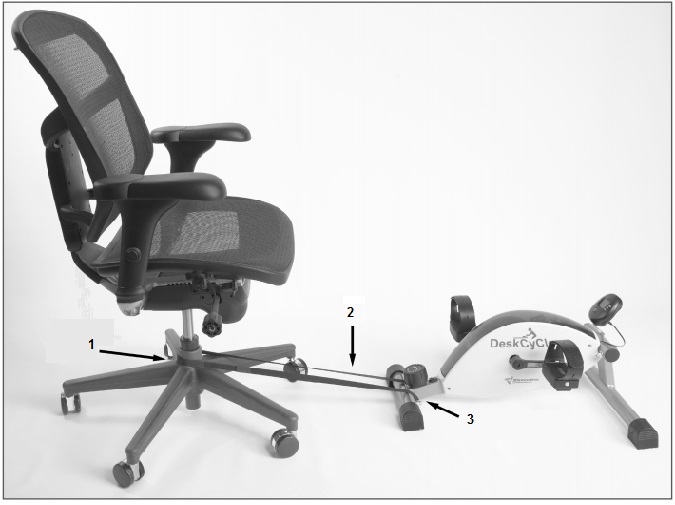
Velcro Tether
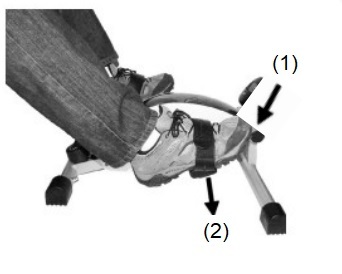
The DeskCycle2™ comes with a long Velcro strap that can be used to tether the bike to the chair as shown in the picture below. The strap is made from Velcro Loop material. On the back side of one end is Velcro Hook material.
Do I need the Tether?
Most people don’t need the tether. Pedalling the bike downward will keep it in place. The tether may be needed if you use a rolling chair or are on a smooth slippery surface. In these cases the tether helps keep the chair from rolling away from the bike.
Installation
1. Position the bike in front of the chair.
2. Sit in your chair and pedal the bike. Your knees should be bent about 25 degrees from fully- extended when the pedal is farthest away from you.
3. Route the Velcro strap (2) as shown in the picture below. Keep the strap as low as possible. Stretch the loop tight and attach the end with the Hook material to the Loop material to make a tight loop. (1) Base of chair, (3) DeskCycle2.
4. Pedal the bike to make sure the distance is correct. Adjust if necessary.
5. Cut away the excess Velcro strap. This will make it easy to create the same size loop later.
Important! You may want to remove the tether when not using the bike to prevent a tripping hazard!
 |
|
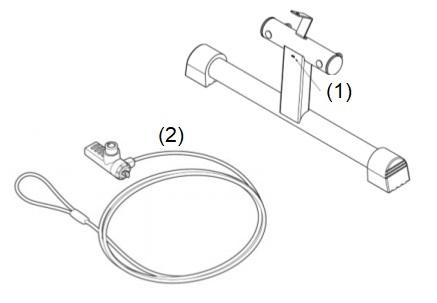
Locking the DeskCycle2 to your Desk!
There is a Kensington Lock Slot (1) on the front of the
DeskCycle2, See picture to the Right.
You can use this slot to secure the DeskCycle2 to
one of your desk legs with a standard Kensington
laptop lock (2) (not included)
|
 |
|
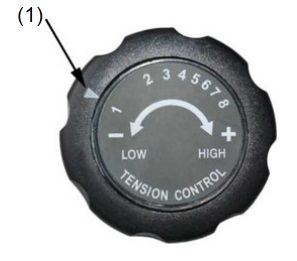
LCD DISPLAY MONITOR
How to Read the Display
There are two numbers displayed on the monitor, one on the top and one on the bottom.
The Mode Button
Press this button to change what is displayed by the bottom number. Each time you press the Function Button the Indicator Arrow moves between
R = RPM (Revolutions per Minute)
D = DIST (Distance pedalled, in Kilometres)
T = TIME (Time pedalled)
C = CALS (Estimated Calories burned)
S = SCAN (RPM, DIST, TIME and CALS)
|
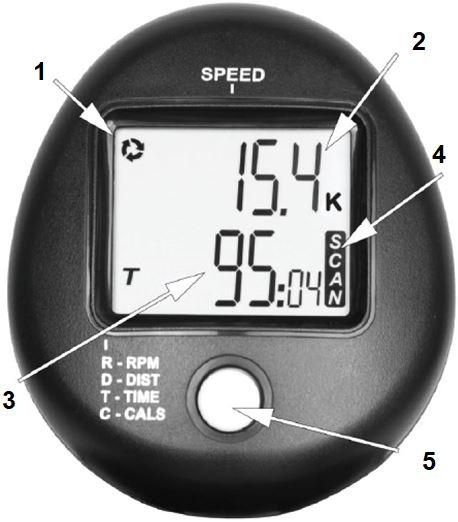 |
Number |
Description |
| 1 |
Stop indicator |
| 2 |
Top Number - Displays speed in Kilometers Per Hour |
| 3 |
Bottom Number - Displays, Distance, Time or Calories |
| 4 |
Scan - ( Moves Between R,D,T&C ) |
| 5 |
Mode Button - ( Also reset button ) |
| |
|
| |
|
SCAN Mode
When SCAN is selected, the lower number will cycle between displaying Time, Distance and Calories. Each will be displayed for about 5 seconds. The Blinking Arrow will point to the function (Time, Distance or Calories) that is being displayed.
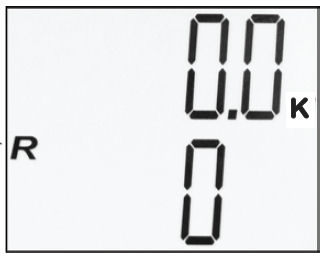
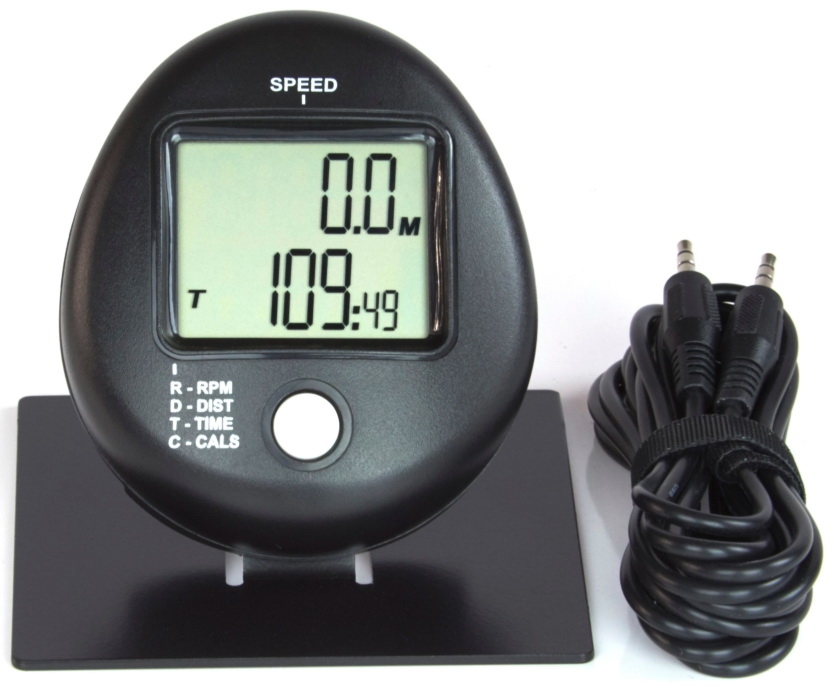
RPM Mode When the RPM Indicator is visible, the bottom number displays your average pedal speed in Revolutions Per Minute. The image to the right shows 0 RPM, which means the bike is not being
pedalled. Also, note that the Pedaling Indicator is not displayed. |
|
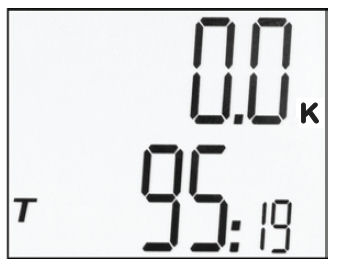
TIME Mode
When the Time Indicator is visible, the bottom number displays the total time you’ve used the bike since the display was last reset. The
image to the right shows 95 minutes and 19 seconds. |
|
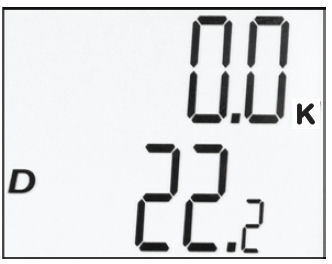
DIST Mode
When the Distance Indicator is visible, the bottom number displays an estimate of the total distance you’ve pedalled since the display was last reset. The image to the right shows 22.2 kilometres note the K in the picture to the right indicates kilometres. |
|
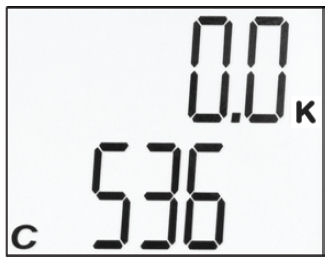
CAL Mode
When the Calorie Indicator is visible, the bottom number displays an estimate of the number of calories burned since the display was last reset. The image to the right shows 536 calories. |
|
Reset Total Time, Total Distance and Calories - Time, Distance and Calories are accumulated as you pedal. To reset these all to zero, press and hold the Function Button for at least 3 seconds.
Turn the Display On and Off - The display turns on automatically when you pedal the bike. You can also turn the display on by pressing the Function Button. You do not need to turn the display off. It will turn off automatically a few minutes after you stop pedalling.
Calorie Accuracy - All mini exercise bikes (and many full-sized bikes) do not measure the power put into the bike. Because of this, their Calorie estimate will be the same no matter what resistance the bike is set to. Measuring power would add considerably higher cost to the price of the bike. We’ve developed a solution that does not add any cost to the bike. We’ve even taken it a step further by including your physical characteristics, without this calorie calculation could be out by more than 100%. See the next page for more details about our free online Calorie Calculator.
Free Online Calorie Calculator
Our online Calorie Calculator calculates the power and also includes the persons physical characteristics to provide a more accurate Calorie estimate than many of the expensive ergometer
|
Our Calorie Calculator calculates the power that
you put into the bike using the resistance dial
setting and your pedal speed.
It also uses your:
• Height,
• Weight
• Gender,
• And age for improved accuracy.
|
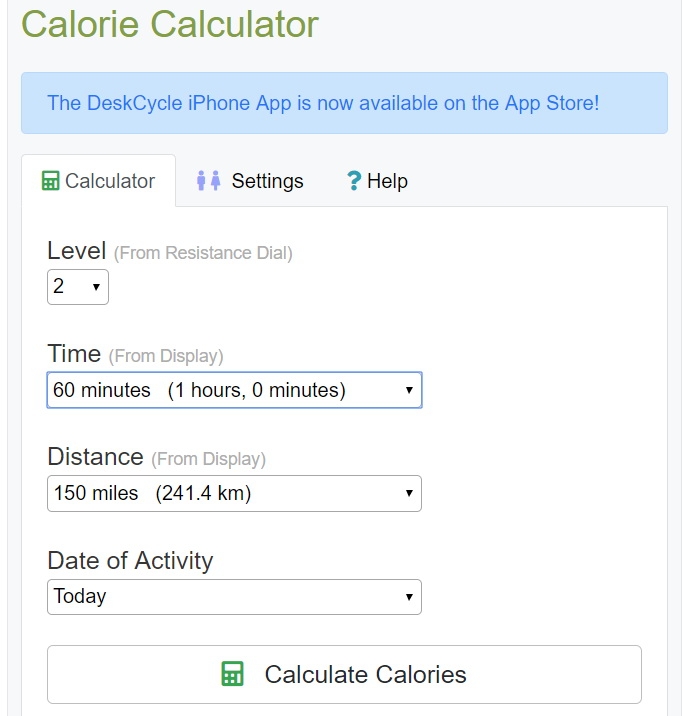 |
The Calorie Calculator is located at the following link
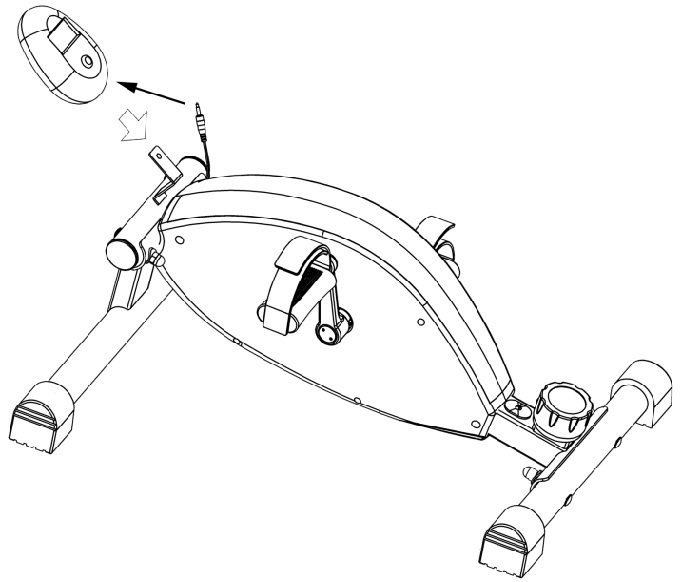
Display Stand for Your Desk
The DeskCycle2 comes with a Display Stand for those who use the DeskCycle2 at their desks. You can quickly switch the LCD monitor from the bike bracket to the desk stand allowing you to easily monitor your exercise routine from your desk or table.
 |
|
|
Connection Instructions
1. Plug one end of the extension cable into the back of the display.
2. Slide the display onto the display stand.
3. Place the stand on your desk.
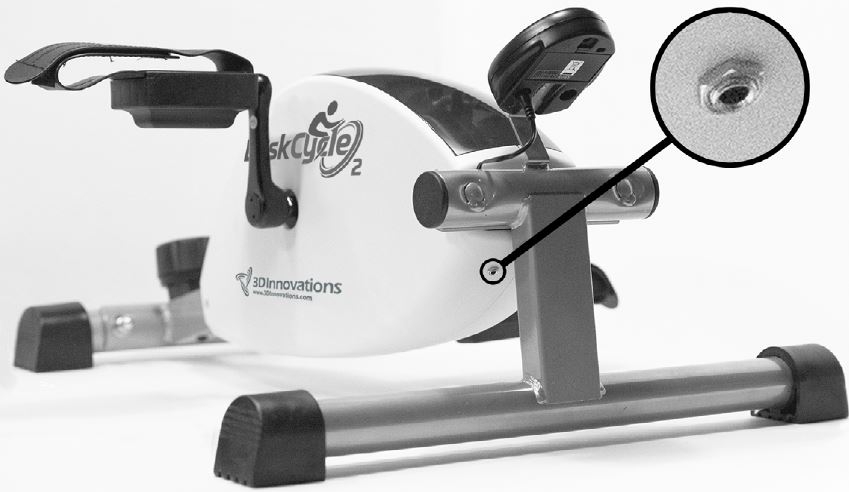
4. Plug the other end of the cable into the female connector on the DeskCycle2. The female connector is shown in the picture to the right.
5. Route the wire so that there is no chance that you will hit it with your feet while pedalling.
|
 |
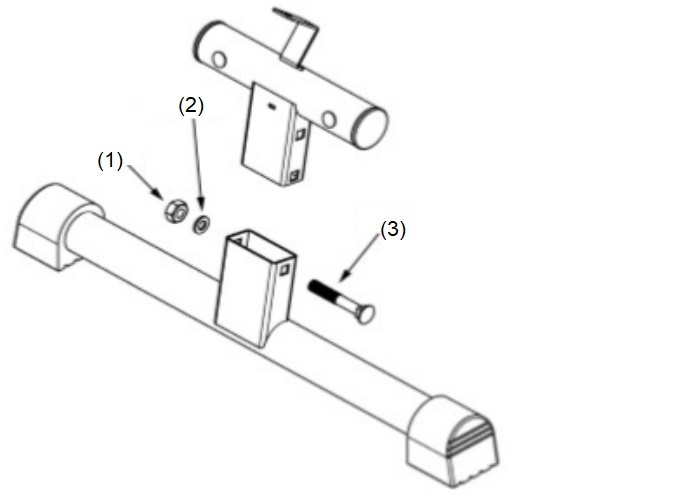
Adjusting the DeskCyle2 Height
- This version of the DeskCycle2comes with an adjustable leg so that you can set the pedal height to 22.8 cm or 25.4 cm. By default, it’s set to 22.8 cm. Follow the steps below to change the height of the DeskCycle2.
- Place the bike on a flat hard surface! Remove the nut (1) and washer (2).
- Remove the bolt (3).
- Set the leg to the desired height and replace the bolt (3).
- Install the nut (1) and washer (2).
- Tighten the nut (1).
Troubleshooting
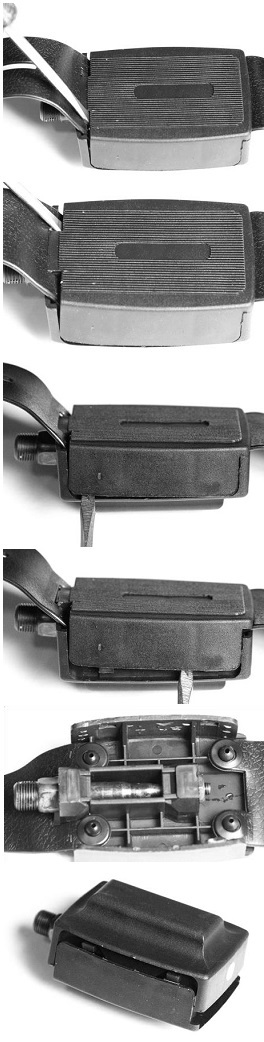
PROBLEM: UNABLE TO INSTALL ONE OR BOTH OF THE PEDALS
Are You Installing The Correct Pedal Into The Correct Pedal Arm? The first thing to note is that there is a left pedal and a right pedal. They are different from each other.
• The Left pedal is marked with an L.
• And the Right pedal is marked with an R.
• The marking is on the end of the pedal shaft.
• The pedal arms are also marked.
• Make sure you install the left pedal into the left pedal arm and the right pedal into the right pedal
arm. See the "Assembly" section in this manual for more details.
Check the Pedals are in Correctly
• Make sure the pedal is straight when you screw it in. The pedals should not be screwed In at an
angle. This will cause cross-threading which can damage the threads.
• Rotate the shaft with your fingers to get the threads started.
• If you can't get the thread started with your fingers then it is likely to be cross threaded. Unscrew
the pedal, make sure the pedal is straight, and then try again.
• The right pedal screws in clockwise.
• The left pedal screws in anti-clockwise.
If you are still having problems, contact us for assistance.
PROBLEM: THE DESKCYCLE MAKES NOISE WHEN PEDALED
Try each solution below to see if it solves your problem. If the noise is still there after you've tried these
solutions, contact us so that we can help you solve the problem.
Solution 1: Tighten The Pedals
Make the pedals as tight as possible using a 15mm spanner.
Important! Using the bike with loose pedals will eventually damage the pedal arm threads. If the pedals
ever come loose, you should immediately stop using the bike and apply Thread Locker such as Blue
Loctite to the pedal threads or clear nail varnish can be effective too. See the section below for instructions.
Solution 2: Tighten The Nuts That Attach The Legs
Each leg is attached to the bike using two nuts. You can use a 13mm spanner to tighten these nuts. Be
careful not to over-tighten the nuts.
PROBLEM: THE PEDALS CAME LOOSE WHEN IN USE
This can happen if the pedals were not properly tightened when the bike was first assembled. If this
happens you should immediately stop using the bike and apply Thread Locker to the pedal threads. See
the section below for instructions.
PROBLEM: THE PEDALS WON'T STAY TIGHTENED OR ARE STRIPPED
Using the bike with loose pedals will eventually damage the pedal arm threads. If caught early, applying
Thread Locker to the pedal threads will solve the problem. See the section below for instructions.
If the threads are too damaged, the pedal won't stay tightened even with Thread Locker applied. In this
case, you can contact us about replacing the pedal arm. If the bike is under warranty we will replace the
first pedal arm for free. Important! Once the pedal arm has been replaced, you should apply Thread Locker
to the threads of both pedals. This will eliminate the chance of this happening again.
Applying Thread Locker to the Threads.
1. Unscrew the pedal. Use a 15mm spanner or the tool provided with the bike.
2. Spread Thread Locker on the threads of the pedal shaft.
3. Screw the pedal back into the pedal arm. Make the pedal as tight as you possibly can.
4. Wait 24 hours before using the bike.
Care and Maintenance
The DeskCycle2 requires little maintenance. If the display on the LCD monitor dims the battery may need changing.
After approximately 72 hours of use, it is recommended you check the DeskCycle2and ensure all nuts and bolts are tightened including the pedals.
No Lubrication Required
The DeskCycle2 contains sealed bearings for years of maintenance-free use. No lubrication is needed. In fact, some lubricants contain chemicals that can actually harm the bearings.
Support
If your DeskCycle2 arrives damaged or with a part or parts missing or in the unlikely event it has a fault you should contact the retailer within 30 working days of receiving it, however it is always helpful to contact us first as we may be able to assist quickly, after this period you should contact us for help.
If you don’t find what you’re looking for, feel free to email us with your questions or suggestions.
Contact
Email: Contact@Deskcycle.eu
Email: TheGymGenie@Gmail.com