|
Please consider the environment before printing this document. |
English: Select your language from the drop-down box above.
German: Wählen Sie Ihre Sprache aus dem Dropdown-Feld oben aus.
Spanish: Seleccione su idioma en el cuadro desplegable de arriba.
French: Sélectionnez votre langue dans la liste déroulante ci-dessus.
Italian: Seleziona la tua lingua dalla casella a discesa in alto.
If any of the information printed in this document appears unclear or is incorrect please report it to us by emailing contact@deskcycle.eu

USER'S GUIDE
Precautions
Failure to observe these warnings could result in physical injury and/or damage to the DeskCycle.
• Do not stand on the pedals! Use the DeskCycle only while sitting. Standing on the pedals can damage the bike.
• Use the DeskCycle indoors on a level surface. Keep the DeskCycle away from moisture and dust.
• Make sure that the pedals are screwed in as tightly as possible. Loose pedals will slowly come undone. Using the bike with loose pedals can damage the threads on the crank arms.
• Do not subject the bike to heavy shock or treat it excessively. Do not disassemble or modify it. Doing so will void the warranty.
• The DeskCycle has sealed bearings and is maintenance free. Lubricants are not necessary and can actually damage the bike.
• Do not place the bike in a location where it will be in contact with direct sunlight or where it will be exposed to high temperatures or excessive humidity.
Safety
Warning! To reduce the risk of serious injury, please read the following safety precautions before using the DeskCycle.
• Read all instructions in this manual before using the DeskCycle. Use the DeskCycle only as described.
• It is the responsibility of the owner to ensure that all users of the DeskCycle are adequately informed of all precautions.
• Do not stand on the pedals! Use the DeskCycle only while sitting.
• Do not place this device in a location where it may cause an obstruction.
Consult Your Physician
It is always important to consult your physician before starting an exercise program. This is particularly true if any of the following apply to your current medical condition:
• Chest pain or pain in the neck and/or arm
• Shortness of breath
• A diagnosed heart condition
• Joint and/or bone problems
• Currently taking cardiac and/or blood pressure medications
• Have not previously been physically active
• Dizziness or blurred vision
• Those with physical handicaps should use this device only under supervision. If none of these apply to you then start gradually and sensibly. However, if you feel any of the physical symptoms listed above when you start your exercise program, contact your physician right away. If one or more of the statements listed above applies for you, see your physician before beginning an exercise program. An exercise-stress test may be used to help plan your exercise program.
Assembly - Installing the Foot Panels
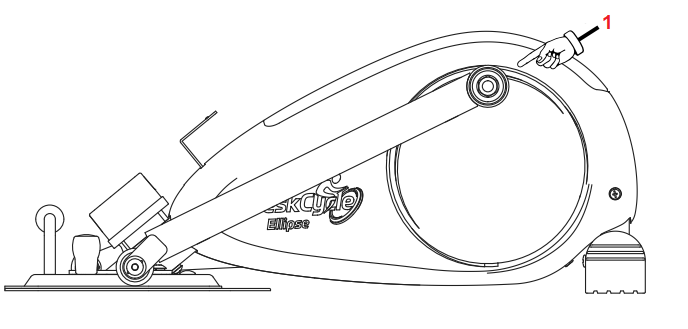
Step 1: Orient the Arm
• Place the DeskCycle on a flat surface.
• Orient the arm so the axle is at the highest point (1), as shown in the drawing below.
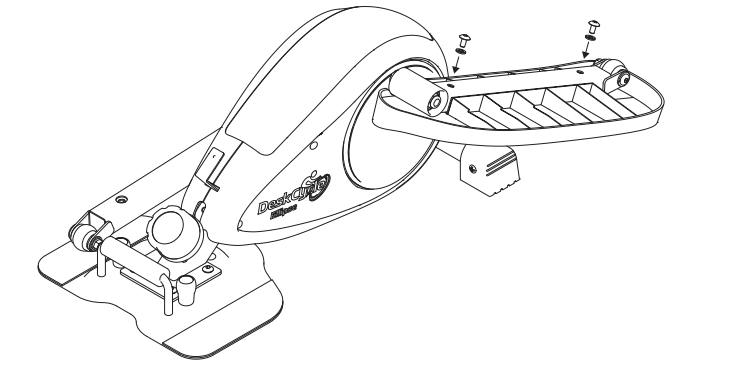
Step 2: Install the Right Pedal
There is a Right pedal and a Left pedal. The pedals are marked on the bottom side.
• Insert the Right pedal into the holes of the Right arm as shown in the drawing below.
Step 3: Install the Screws
• Flip the arm over as shown in the drawing.
• Install the two bolts and washers into the pedal.
• Tighten the bolts with the provided hex wrench.
• Flip the pedal back over.
Step 4: Repeat Steps 1 through 3 for the Left Pedal.
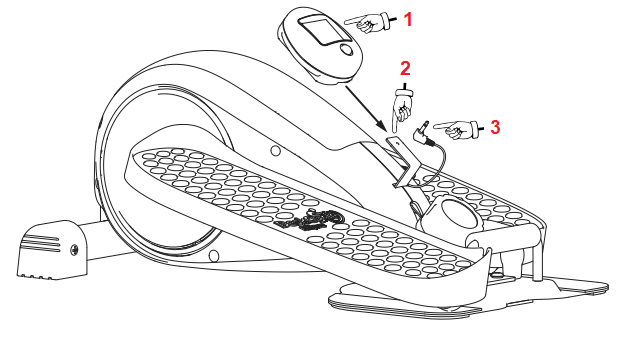
Installing and Removing the Display
• Plug the Connector (3) into the Display.
• Carefully slide the Display (1) onto the Display Bracket (2) as shown in the picture.
When removing the display, be sure to unplug the connector first.
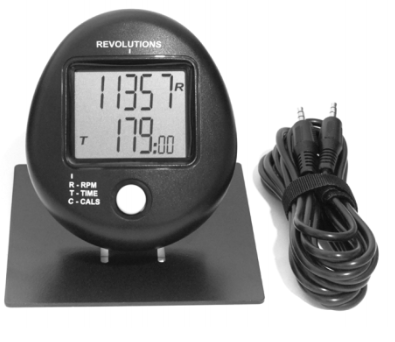
Using the Display
There are two numbers on the display; one on the top and one on the bottom. See the image below.
• The Top Number always displays the total number of revolutions you’ve pedalled the bike since the
display was the last reset. The display will keep track of up to 99,999 revolutions.
• The Bottom Number displays RPM, Time or Calories.
|
The Mode Select Button
Press the Mode Select Button to select what
the bottom number displays.
Each time you press the Mode Select Button,
the mode changes between the 4 modes
below:
1. SCAN (RPM, TIME and CALS)
2. RPM (Revolutions Per Minute)
3. TIME (Time)
4. CALS (Estimated Calories)
SCAN Mode
When the Scan Mode Indicator is visible, the
lower number will cycle between displaying
RPM, Time and Calories. Each will be
displayed for about 5 seconds at a time.
|
Pedalling Indicator Visible when you are pedalling
|
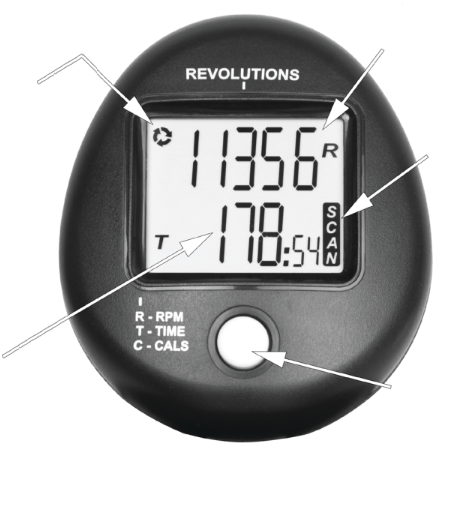 |
Top Number Displays Pedal Revolution Count.
Scan Mode Indicator When visible the bottom number changes
|
|
Bottom Number Displays RPM Time or Calories
|
Mode Select Button Press to change Mode. Hold to reset counters.
|
| |
|
|
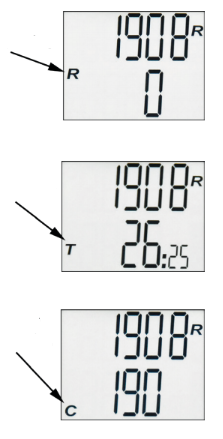
RPM Mode
When the RPM Indicator is visible, the bottom number displays your average pedal speed in Revolutions Per Minute. The image to the right shows 0 RPM, which means the bike is not being pedalled. Also, note that the Pedaling Indicator is not displayed.
|
RPM Indicator
|
 |
|
TIME Mode
When the Time Indicator is visible, the bottom number displays the total time you’ve used the bike since the display was the last reset. The image to the right shows 26 minutes and 25 seconds.
|
TIME Indicator
|
|
CALS Mode
When the Calorie Indicator is visible, the bottom number displays an estimate of the number of calories burned since the display was the last reset. The image to the right shows 190 calories.
|
CALORIE Indicator
|
How to Reset Revolutions, Time and Calories
Time, Distance and Calories are accumulated as you pedal. To reset these all to zero, simply press and
hold the Mode Button for about 3 seconds.
How to Turn the Display On and Off
The display automatically turns on when you pedal the bike. You can also turn the display on by
pressing the Mode Button. The display automatically turns off a few minutes after you stop pedalling.
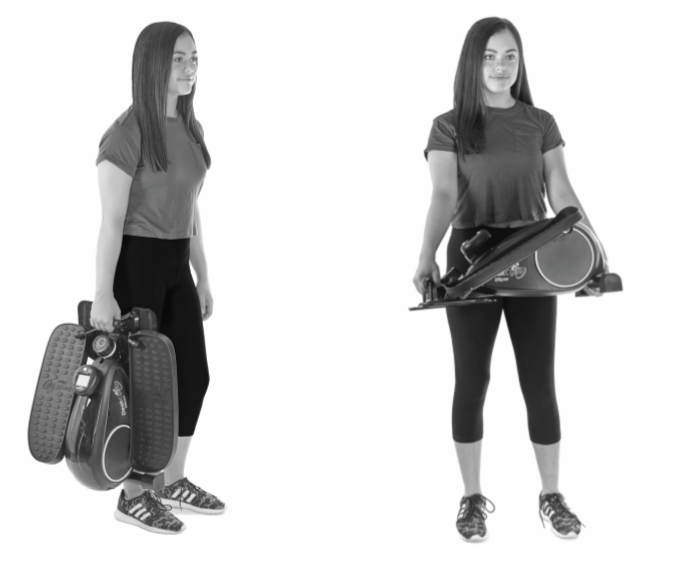
Display Stand for Your Desk
The DeskCycle Ellipse comes with a display stand for those who use the DeskCycle at their desks.
The Display Stand lets you place your display anywhere on your desktop. |
 |
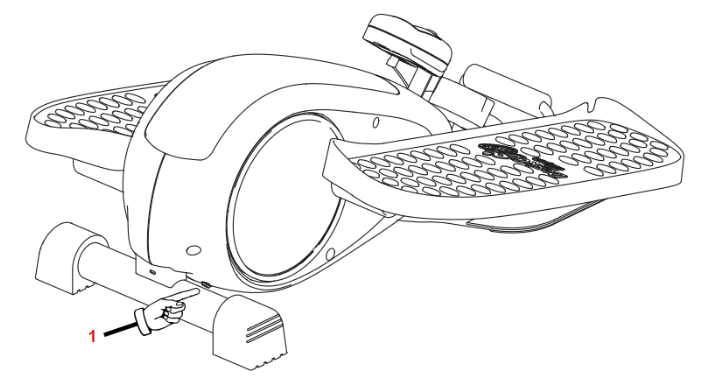
Connection Instructions
- Plug one end of the extension cable into the back of the display.
- Slide the display onto the stand.
- Place the stand on your desk.
- Plug the other end of the cable into the female connector (1) on the DeskCycle. The female connector is shown in the picture to the right (1).
- Route the wire under the front leg so that there is no chance that you will hit it with your feet while pedalling.
|
 |
Free Online Calorie Calculator
A Much More Accurate Calorie Estimate
Only the expensive ergometers measure power. Power measurement is required for a decent Calorie estimate. However, most true ergometers don’t take into account the physical characteristics of the person using the bike. Without these, the Calorie estimate can be off by more than 100%.
Our online Calorie Calculator calculates the power and also includes the persons physical characteristics to provide a more accurate Calorie estimate than many of the expensive ergometers.
|
Our Calorie Calculator calculates the power that
you put into the bike using the resistance dial
setting and your pedal speed.
It also uses your:
• Height
• Weight
• Gender
• And age to improve the accuracy.
The Calorie Calculator is free and is located at deskcycle.com
|
 |
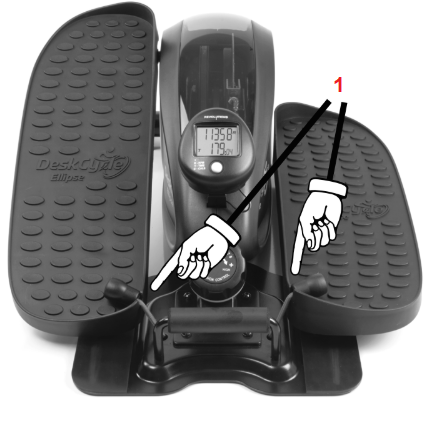
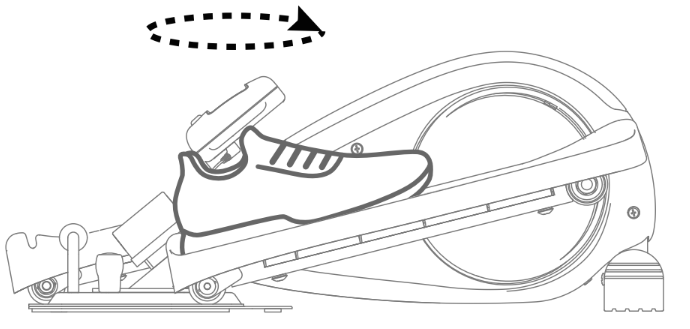
Foot Placement for Motion Type
The DeskCycle has longer pedals than the other desk ellipticals. This lets you choose the type of pedal
motion you want. You control the type of pedal motion by where you place your feet on the pedals.
|
Rear Foot Position for Flatter Motion
Placing your heels against the rear of the pedal makes your pedal motion the flattest.
Provides the Best Desk Clearance
This position also provides the most
clearance between your knees and the underside of your desk because:
• Your foot position is lower.
• Your vertical knee motion is
minimum.
|
 |
|
Front Foot Position for More Circular Motion
Placing your toes against the front of the pedal makes your pedal motion
more circular.
Provides More Range of Motion
The closer your toes are to the front of the pedal, the greater your range
of motion will be.
|
 |
|
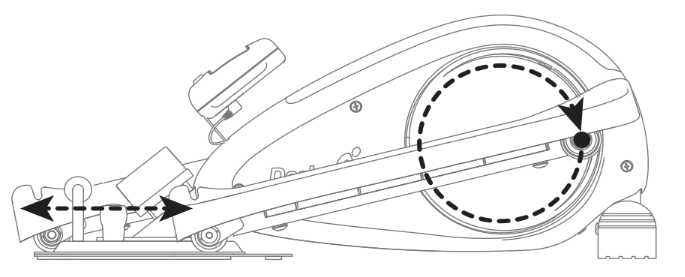
How does it work?
• The front of the pedal travels in a circle.
• The back of the pedal travels in a straight line.
The position of your foot determines how circular your pedal motion is.
|
 |
Adjusting the Resistance
|
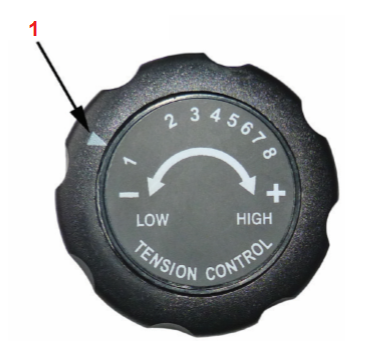
Adjusting the Pedal Resistance
• There are 8 tension settings.
• The Tension Indicator arrow (1) points to the current tension setting.
• The higher the number, the higher the pedal resistance.
|
 |
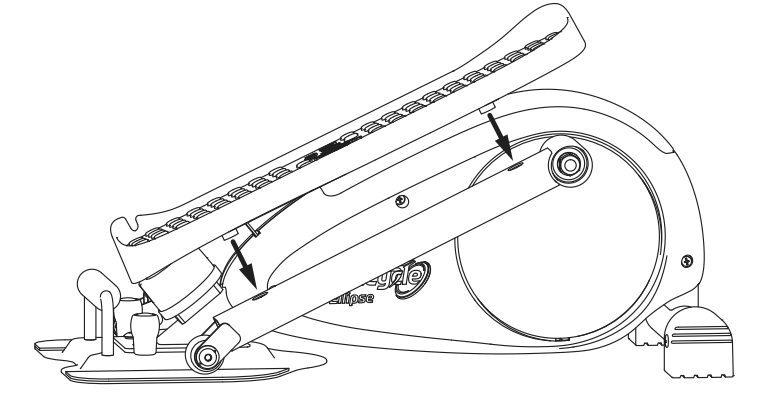
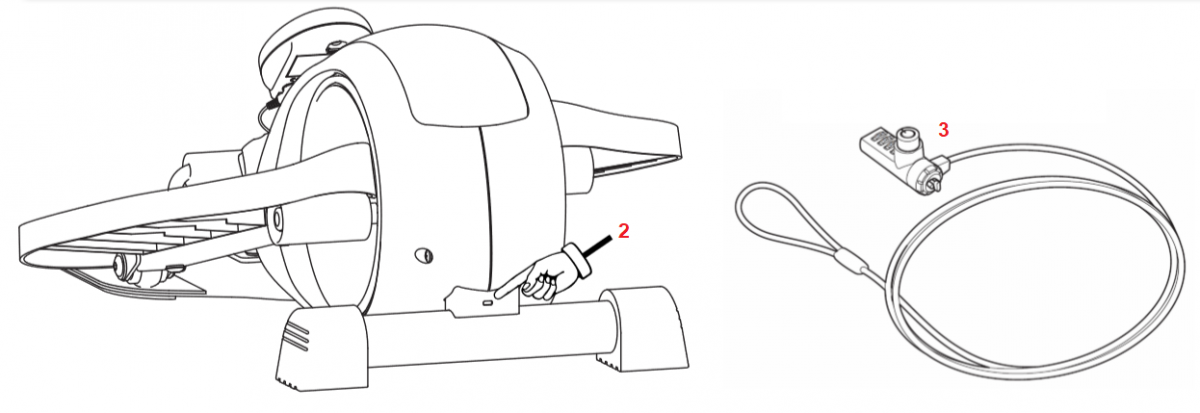
Locking the DeskCycle to Your Desk
There is a Kensington slot (2) on the front leg of the DeskCycle. See the picture below.
You can use this slot to secure the DeskCycle to one of your desk legs with a standard Kensington laptop lock (3) (sold separately). |
 |
Optional Accessories
Contact TheGymGenie@Gmail.com for information.
Care and Maintenance
Care
• Do not stand on the pedals! The DeskCycle Ellipse was not designed to be used while standing.
Maintenance
The DeskCycle Ellipse requires no maintenance.
Do Not Lubricate
The DeskCycle Ellipse contains sealed bearings that provide many years of maintenance-free use. No
lubrication is needed. Some lubricants contain chemicals that can actually harm the bearings.
Support
For answers and support please contact contact@deskcycle.eu
Full 1 Year Warranty in the EU
We stand behind our products. The DeskCycle Ellipse and its accessories are covered by a full one-year
warranty on all parts and labour. This warranty is for US customers only. Outside of the US, the
warranty depends on your local distributor.
The support contact link for your country can be found on
deskcycle.com.
What Is Covered?
We warrant the DeskCycle against defects in material or workmanship for a full year from the date of
purchase.
• Parts: All parts are covered under this warranty.
• Labour: All labour is covered under this warranty.
• Shipping: All shipping is covered by this warranty.
What Is Not Covered?
This warranty does not cover damage caused by neglect, abuse or misuse.