 Please consider the environment before printing this manual.

| |
 |
|
| |
Manufactured by Lets Away Ltd |
|
| |
USER GUIDE |
|
| |
| NEW! Interactive Exercise - Next Generation Fitness Fun! |
| Get £20 off iXplore - use Voucher Code LAL20 - FREE - iXVGamer with every iXplore Purchase! |
|
CLICK HERE for more details and to BUY NOW!
|
|
If for any reason parts of this translated document are not clear, please email us your questions so we can clarify any confusion.
Welcome to the future of forms and manuals an online translation service facilitated by Google. This document may be updated without notice to provide late edits, should any be necessary. If you prefer a printed copy you will need a printer connected, press print at the top of the page and follow the prompts.
|
| |
| |
| |
CAUTIONS
- Failure to observe these warnings could result in physical injury or damage to the Bike.
- Use the Bike indoors on a level surface. Keep it away from moisture and dust.
- Make sure that the pedals are on tight. Loose pedals will slowly come undone. Using the bike with loose pedals can damage the threads on the crank arms. Stripped crank-arm threads are not covered by the warranty. Perform a daily inspection of the product before using it.
- Wear suitable clothing when using the Bike. Do not wear loose clothing that could become caught on the bike.
- This device is a precision instrument. Do not subject the device to heavy shock or treat it excessively. Also, do not allow water to come into contact with the device. Do not disassemble or modify it. Doing so will void the warranty covering repair and after-sales service.
- The Bike has sealed bearings and is maintenance-free. Lubricants are not necessary and can actually damage the bike
- Do not place the device in a location where it will be in contact with direct sunlight or where it will be exposed to high temperatures, excessive humidity or moisture.
SAFETY
Warning! To reduce the risk of serious injury, please read the following precautions before using the Bike.
Read all instructions in this manual before using the Bike. Use it only as described. It is the responsibility of the owner to ensure that all users of the Bike are adequately informed of all precautions.
Never use this device after drinking alcohol; doing so is dangerous and could result in serious injury or accident.
Do not place this device in a location where it may cause an obstruction. Do not leave the device unattended after use. Be sure to move and store it in a safe place to avoid injury.
Consult Your Physician It is always important to consult your physician before starting an exercise program. This is particularly true if any of the following apply to your current medical condition:
- Chest pain or pain in the neck and/or arm
- Shortness of breath
- A diagnosed heart condition
- Joint and/or bone problems
- Currently taking cardiac and/or blood pressure medications
- Have not previously been physically active
- Dizziness or blurred vision
- Those with physical handicaps should use this device only under supervision If none of these applies to you then start gradually and sensibly. However, if you feel any of the physical symptoms listed above when you start your exercise program, contact your physician right away. If one or more of the statements listed above applies for you, see your physician before beginning an exercise program. An exercise -stress test may be used to help plan your exercise program.
Consult Your Physician
It is always important to consult your physician before starting an exercise program.
Assembling your Bike
Step 1: Install the Rear Support Leg
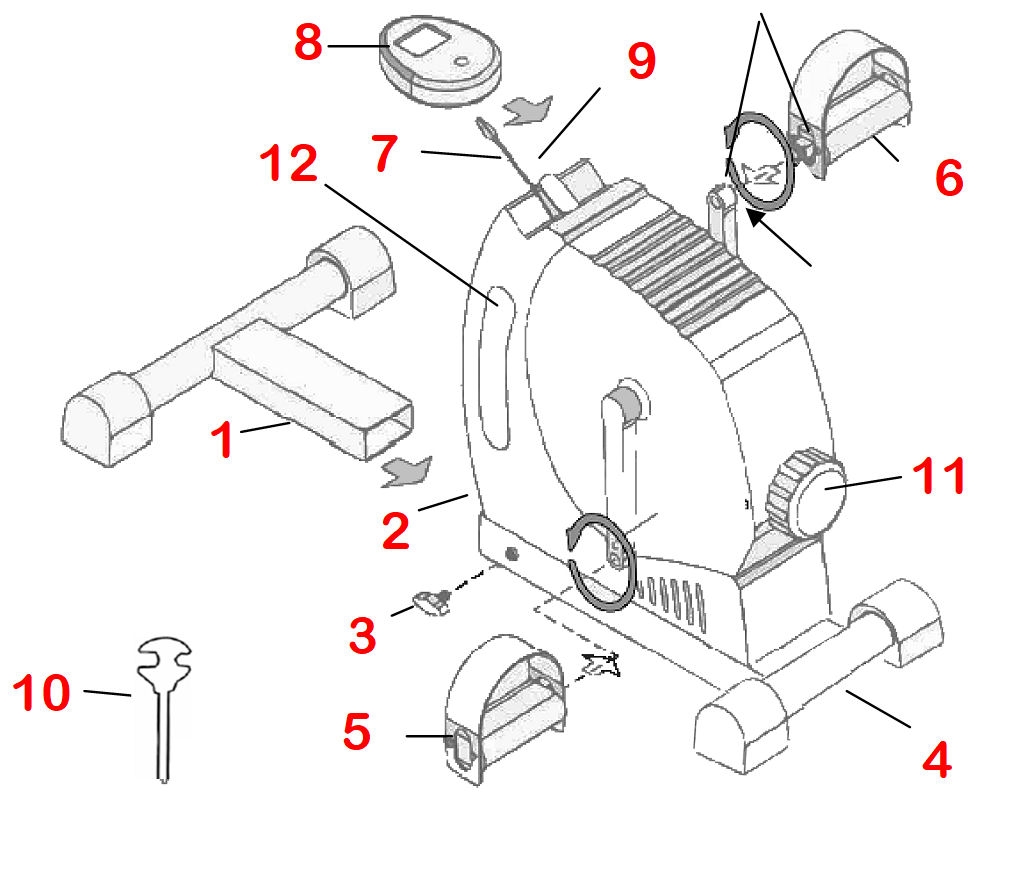
Insert the Adjustable Support Leg (1) into the Bike Assembly Then screw the Wing Nut (3) into the Bike Assembly Loosen the Wing Nut then slide the leg in and tighten the wing nut to hold it. For the maximum stability, extend the Adjustable Support Leg as far out as possible.
Step 2: Install the Pedals
Double-check your “R” to “R” and “L” to “L”
Hand screw the LEFT pedal into the LEFT crank arm ANTI-CLOCKWISE! Hand screw the RIGHT pedal into the RIGHT crank arm CLOCKWISE! always screw by hand until you have the pedal screwed in so it is hand tight, once in tightening with the tool provided.
Step 3: Install the LCD Display
Plug the Display Connector into the Display (7). Then slide the Display (8) onto the Display Mounting Bracket (89).
| Part Number/Item |
| 1 |
Adjustable Front Leg |
| 2 |
Main Body / Rear Support |
| 3 |
Leg Retaining Wing Nut |
| 4 |
Front Fixed Leg |
| 5 |
Left Hand Pedal |
| 6 |
Right Hand Pedal |
| 7 |
Monitor Cable and Plug |
| 8 |
Monitor / Timer |
| 9 |
Monitor Holding Bracket |
| 10 |
Tool - Style may be different |
| 11 |
Resistance Control Dial |
| 12 |
Built-in Carrying Handel |
How to use
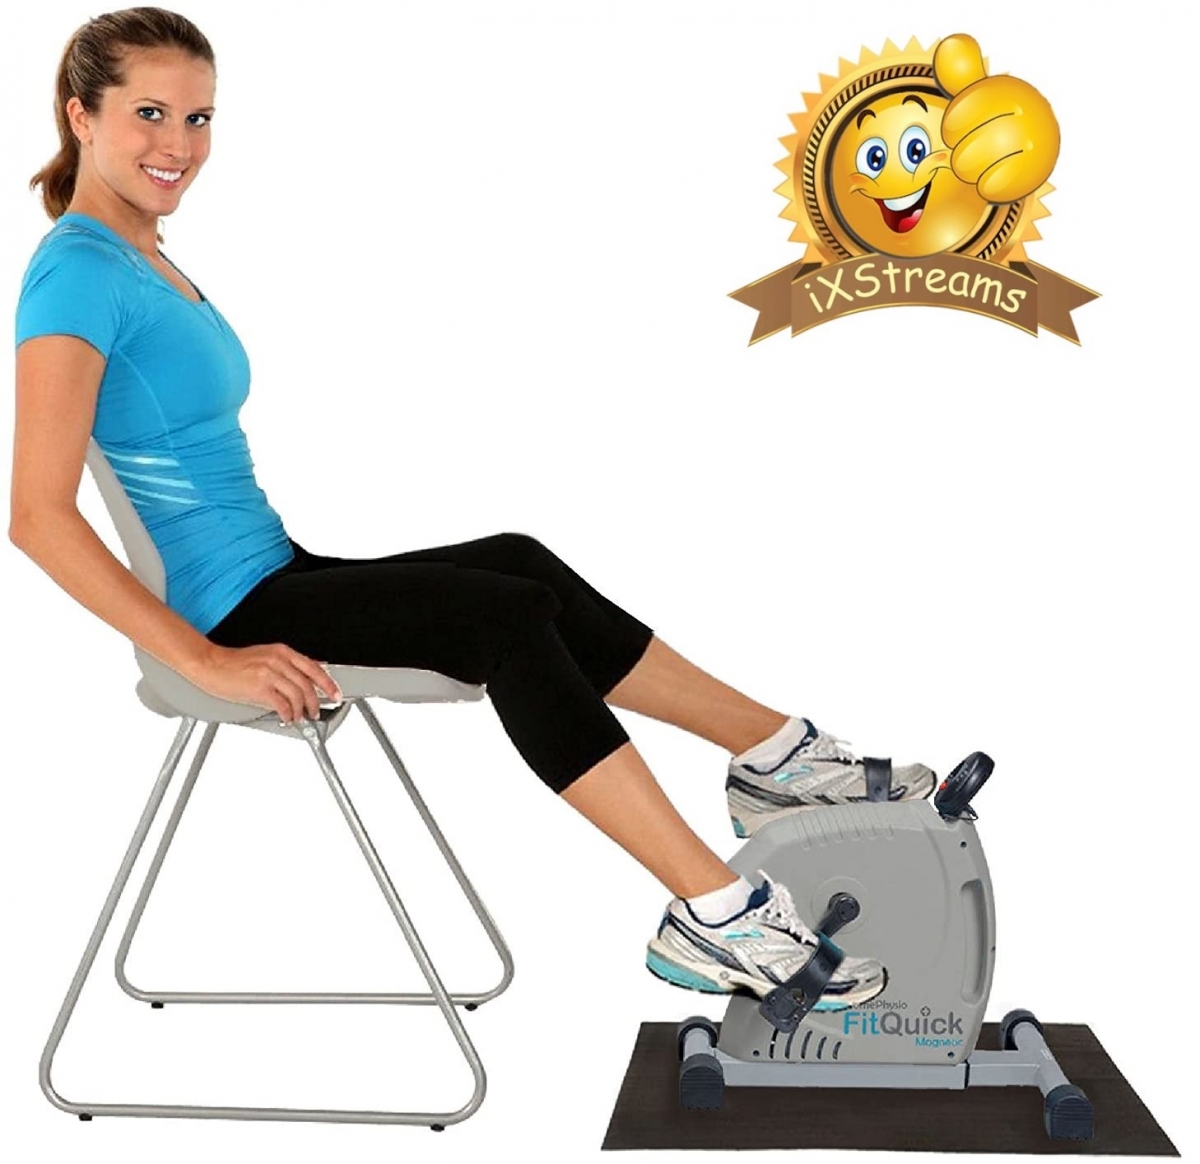
Using your FitQuick Magnetic Cycle.
Sit on a chair with the bike in front on an even flat surface at a distance where you can turn a full cycle of the pedals without any discomfort. Place your feet onto the peddles under the straps, It is recommended that you start off cycling at a low speed and a low resistance setting (set by turning resistance control 11, clockwise increases resistance anticlockwise decreases resistance). building up as your muscles warm-up and as your fitness level dictates. The cycle can be used bi-directionally in both forward and reverse to work for different muscle groups.
Extending the Support Leg
For maximum stability, your Magnetic Cycle has a wide-based extending leg at the rear (furthest from your chair) this should be extended as far out as necessary during workouts to give enhanced stability. When not in use it can be retracted for easy storage.
Using the Bike with your Arms
Place the bike on a tabletop to exercise your arms. You can pedal in the forward and reverse directions to work for different muscle groups.
The Correct Way to Cycle.
When cycling try not to push the bike forwards with your legs, instead pedal with a downward force pushing the pedals towards the ground this will alleviate forward movement of the bike when cycling quickly or at a high resistance setting. If you cycle incorrectly or sit on a low chair you will push the bike forwards, it was not designed to be used this way. If you experience problems try a higher chair or anchor the extended bike leg against a solid object like a wall or a heavy table leg. 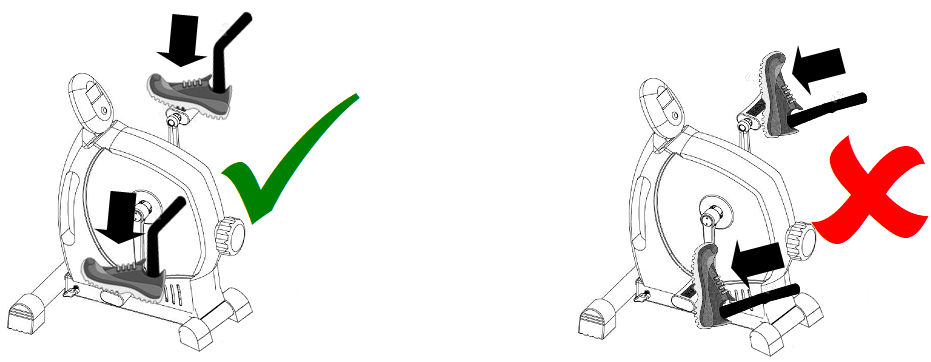
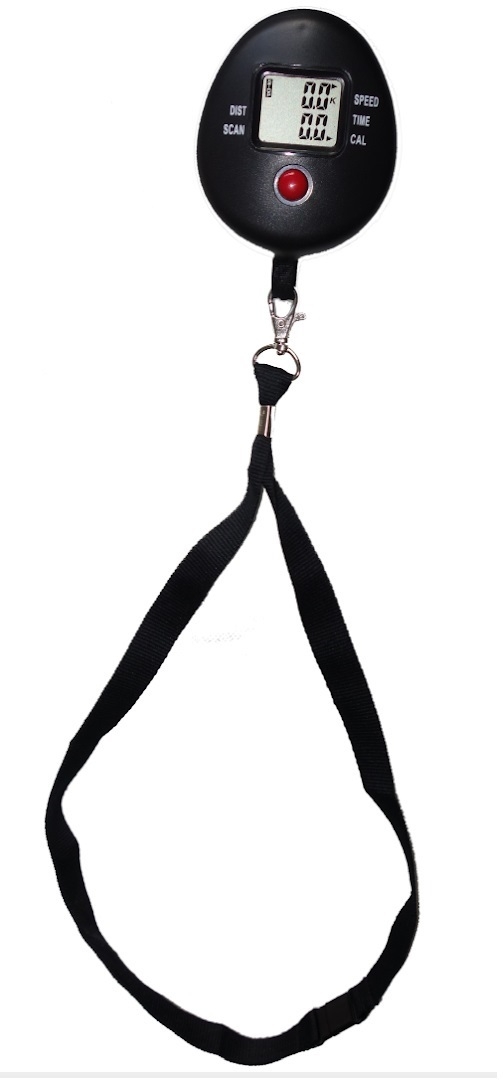
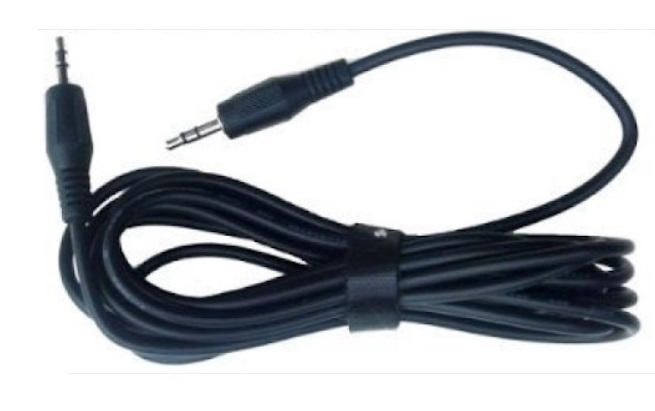
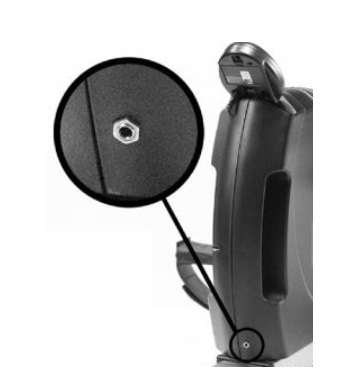
Using the Lanyard Accessory*
There is a loop under the LCD Display to attached the Lanyard strap (1) using the 100cm Jack Lead (2) attach one end to the LCD Display and the other end to the additional Jack Socket on the Mini Exercise bike (3), hang the quick-release Lanyard around the neck allowing you to sit back and relax and easily view the timer display (4)
(*Not available on all models)
Hard Smooth Floors
To use the bike on a hard floor or smooth carpeted floor we provide a slip-resistant mat this should be placed under both front and rear legs and help alleviate any slip, please refer to the correct way to cycle if you experience any problems. The mat is also useful as a carpet protector.
The cycle is not designed for use with wheeled office style chairs though if this is your only option a strap which loops under the short leg of the bike and round the upright base of the chair can help.
It is not designed to be used under a low or standard-sized table as the pedal height is too high if you want to use a bike at a table or desk you will need a high table. There are also specialist cycles available to fit under desks, email us if you want details sending.
Carrying
There is a built-in carrying handle at the front of the bike under the timer. We recommend lifting with one hand while supporting the front short leg with the other.
The Display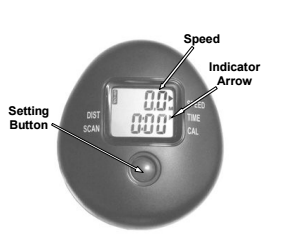
Readout: There are numbers displayed on the monitor, one on the top and one on the bottom.
Top Number: The top number always displays your speed, in kilometres per hour.
Bottom Number: The bottom number displays Distance, Calories or Time.
The Function Button
Press this button to change what is displayed by the bottom number. Each time you press the Function Button the Indicator Arrow moves between.
- TIME (Total time pedalled) (total Distance pedalled, in kilometres)
- DIST (total Distance pedalled, in kilometres)
- CAL (total Calories burned)
- SCAN
The indicator arrow points to the function that is being displayed. For example, in the picture the Indicator arrow is pointing to DIST, so the lower number displays the total distance pedalled.
SCAN
When SCAN is selected, the lower number will cycle between displaying Time, Distance and Calories. Each will be displayed for about 6 seconds. A second indicator arrow will point to the function (Time, Distance or Calories) that is being displayed.
How to Reset Total Time, Total Distance and Calories
Time, Distance and Calories are accumulated as you pedal. To reset these all to zero, press and hold the Function Button for at least 3 seconds.
How to Turn the Display On and Off
The display turns on automatically when you pedal the bike. You can also turn the display on by pressing the Function Button. You do not need to turn the display off. It will turn off automatically a few minutes after you stop pedalling.
Care and Maintenance
Keep the Pedals Tightened: Loose pedals will slowly come undone. Using the bike with loose pedals can damage the threads on the crank arms.
No Lubrication Needed: The Bike contains sealed bearings for years of maintenance-free use. No lubrication is needed.
Support
Warranty: 12 months warranty on all parts and labour.
What is covered? : We give a warranty for the bike and accessories against defects in material or workmanship for a full year from the date of purchase. At our option, we will repair or replace the defective product.
Parts: All parts are covered under this warranty.
Labour: All labour is covered under this warranty. In most cases, a local bike shop can perform the repairs and the labour charge is reimbursed to the customer.
Shipping: For the first 30 days, we will pay for shipping costs. After 30 days, we will pay for the shipping to the customer and the customer pays for the shipping to us.
What is not covered: This warranty does not cover damage caused by neglect, abuse or misuse and cannot be transferred.
How to get Service: Contact us by email to request a warranty repair. Please provide your order reference number and a description of the problem.
Contact Information Email: TheGymGenie@Gmail.Com