Page 1/6
Please consider the environment before printing this document.
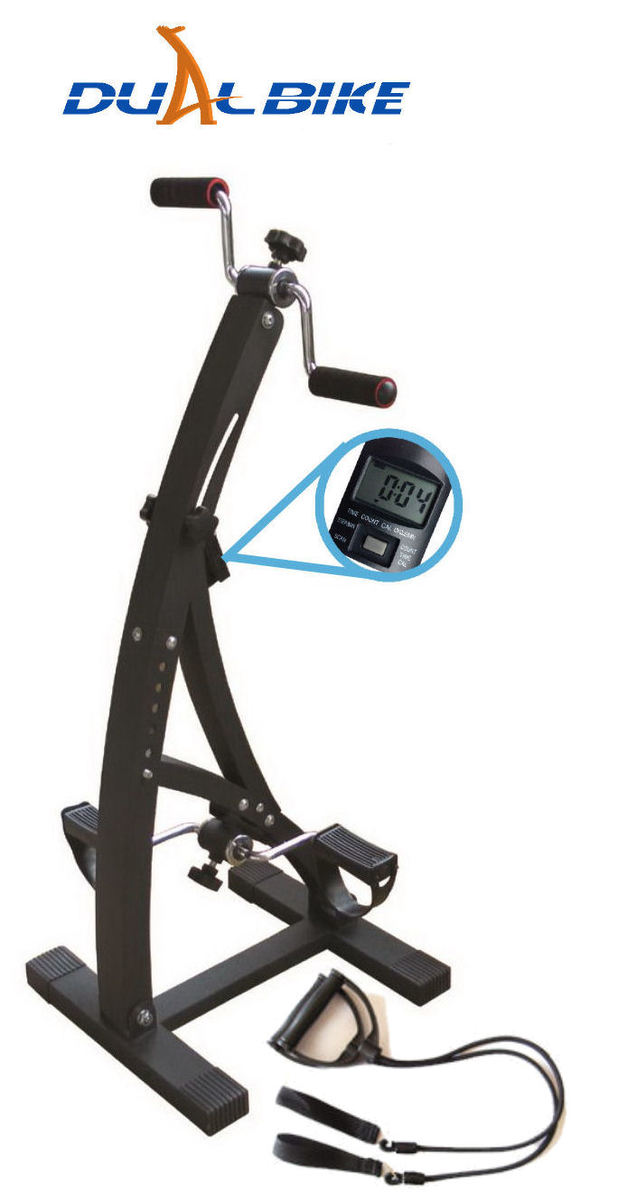
Dual Bike User Manual
Dual Bike Quick Assembly - Video

Please consider the environment before printing this document.
Dual Bike User Manual
Dual Bike Quick Assembly - Video
Diagram 1
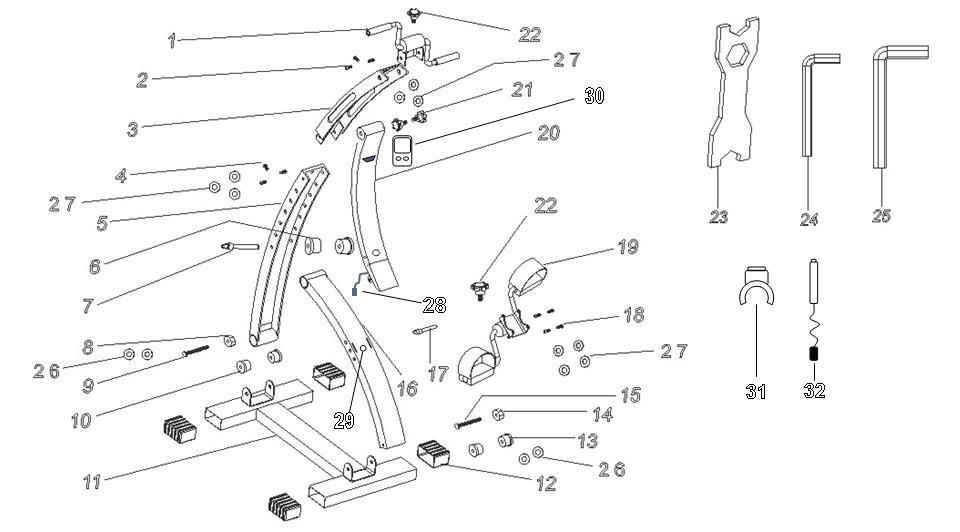
| Item Number | Name | Specification | Quantity | Notes |
| 01 | Rotating Hand Pedals | One Pair | ||
| 02 | Socket Head Bolts | M8*15 | 3 | |
| 03 | Curved Profile D | 1 | ||
| 04 | Socket Head Bolts | M8*15 | 3 | |
| 05 | Curved Profile A (Front) | 1 | ||
| 06 | Plastic Sleeves | 10*12mm | 2 | TP |
| 07 | Large Pulling Bolt - Adjust | 1 | ||
| 08 | Locknut | M10 | 1 | |
| 09 | Socket Head Bolts | M10*85 | 1 | |
| 10 | Metal Sleeve | 10*8.5mm | 2 | Galvanised |
| 11 | Base | 1 | ||
| 12 | Feet | 60*30mm | 4 | |
| 13 | Plastic Sleeve | 10*12mm | 2 | TP |
| 14 | Locknut | M10 | 1 | |
| 15 | Socket Head Bolts | M10*85 | 1 | |
| 16 | Curved Profile B (Rear) | 1 | ||
| 17 | Small Pulling Bolt | 8*55 | ||
| 18 | Socket Head Bolts | M8*15 | 4 | |
| 19 | Foot Pedals | One Pair | PP + ABS | |
| 20 | Curved Profile C | 1 | ||
| 21 | Height Adjusting Screw | M8*18 | 2 | |
| 22 | Resistance Adjusting Screw | M10*18 | 2 | |
| 23 | Multi Wrench Spanner | 17-19# | 1 | |
| 24 | Small Hexagon Allen Key | 5mm | 1 | |
| 25 | Large Hexagon Allen Key | 6mm | 1 | |
| 26 | Flat Washer | 10.5 | 4 | |
| 27 | Flat Washer | 8.5 | 10 | |
| 28 | Cable to the Timer | 1 | ||
| 29 | Hole for Timer Cable | 1 | ||
| 30 | Timer | 1 | Time, Calories etc | |
| 31 | Clip on Magnet | 1 | ||
| 32 | Magnetic Sensor | 1 |
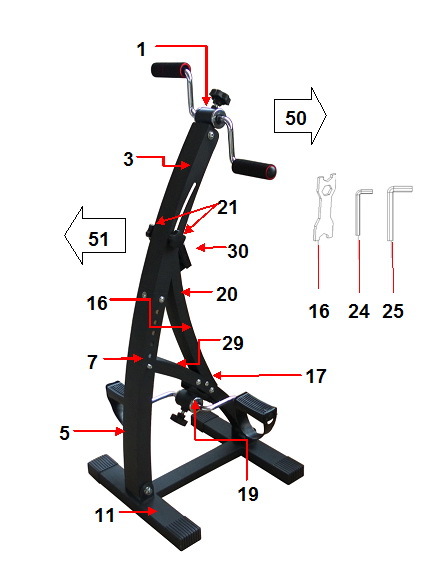
Installation Instructions - Use Diagrams 1 and 2
Step 1
Remove nuts, bolts, washers and metal sleeves (10) from front of base (11). Attach curved profile (5), refit the components. Use the hexagon spanner one side and multi wrench tools the other to tighten.
Step 2
Remove nuts, bolts and washers from rear of base (11). Attach curved profile (16), refit the components. Use the hexagon spanner one side and multi wrench tools on the other to tighten.
Step 3
Make an inverted “V” with both profiles and insert large pulling pin (7) to secure.
Step 4
Remove nuts, bolts and washers from foot pedals (19) and fit underneath curved profile (16), refit components using spanner and wrench to tighten.
Step 5
Remove fixings from curved profile hand pedal support (3), slot into top of curved profile (5), refit components using spanner and wrench to tighten.
Step 6
Remove height adjuster knobs (21) from curved profile (20) . Slot (20) into the two corresponding slots on profile (16), with the outer curve facing outward. Feed the timer cable (28) through hole (29) See diagram 1, reattach adjuster knobs through curved slots on curved profile (3), hand tighten, insert small pin (17) to secure profile (20) to (16).
Step 7
Slide sensor (32) from right hand side through the plastic clip between the foot pedals (19) and fit magnet (31) onto left pedal shaft directly opposite and facing the sensor head, adjust the depth of the sensor so it is close but not touching the magnet, around 8mm is OK.
Step 8
Attach the plug and socket ends of the sensor and the timer wires (28) and (29).
Step 9
Remove fixings from hand pedals (1) and slot into top of curved profile (3), refit the components using the tools provided.
1. Profile D Hand Pedal Support
3. Curved Profile D
5. Curved Profile A
7. Adjustable Pulling Pin (Large)
11. Base
16. Curved Profile B
17. Adjustable Pulling Pin (Small)
19. Foot Pedal Assembly with Resistance Control
20. Curved Profile C
21. Height Adjuster Knobs
23. Spanner Tool
24. Small Hexagonal Allen Tool
25. Large Hexagonal Allen Tool
29. Hole for Timer Cable
30. Timer
50. Rear of Bike
51. Front of Bike
Adjusting the height of the bike:
To Increase the resistance on the foot and hand pedals:
Rotate clockwise the resistance knob on either foot pedal or hand pedal to adjust resistance levels. Start off on a low resistance and increase as your fitness level improves.
Adjusting the pedal strap
There is a small amount of adjustment on the pedals. Detach the strap and chose the girth level, reattach and ready to use.
Important safety Information
Note: The pictures in these manual, schematic pictures for reference only, appearance and technical parameters may change without notice.
Training
Use of this product can enhance physical fitness, help build and tone muscle as well as exercising the cardiovascular system.
Timer - Exercise Monitor (30)
Press the button once to activate, keep pressed to reset.
Each press of the button will move the arrow on the LCD display to select the function to view.
The functions include:
Resistance Bands (33)
To work a wider range of muscle groups in the upper body your Dual Bike includes 2 resistance bands. Fit these over each side of the feet at the rear of the base (11). Use the resistance bands in a standing or sitting position with one foot pressing down on the base. Alternatively slip the resistance band over your shoed foot standing on it to secure.
BICEPS CURL palm facing up
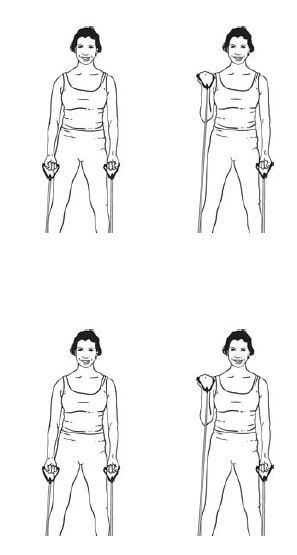 Hold the other end of band or tube with the hand on same side of the body. Stabilize your upper arm against your body. Begin with forearm parallel to floor, palm facing up.
ACTION Lift your palm toward body against resistance. Keep wrist joint flat. Feel a strong contraction in your biceps muscle. Lower slowly.
VARIATIONS
(EASIER) Perform exercise in a seated position.
(HARDER) One end in each hand, anchor both upper arms against torso. Lift both arms at the same time. Lower slowly.
REVERSE BICEPS CURL palm facing down
The reverse biceps curl strengthens and tones the muscles in the
front of your upper arm and in your forearm.
Hold the ends of the band or tube with hand on same side of the
body. Stabilize upper arm against the body. Begin with forearm parallel to floor, palm facing down.
ACTION Lift arm toward body against resistance so that palm faces forward. Keep wrist joint flat. Feel a strong contraction in your biceps muscle and in the muscle on the top of your forearm. Lower slowly.
VARIATIONS
(EASIER) Perform exercise in a seated position.
(HARDER) One end in each hand anchor both upper arms against
torso. Lift both arms at the same time. Lower slowly.
Warm-up exercises (recommended before training)
Warm-up exercises can enhance the body's blood circulation; making the muscles ready for a good workout this will help reduce muscle cramps or muscle strains during prolonged workouts. It is recommended you do a warm-up exercises before each session.
Care and Maintenance
No Lubrication Needed. The Bike contains sealed bearings and should give years of maintenance-free use.
Support
Email: TheGymGenie@Gmail.com
Warranty
12 months warranty.
Damaged or Faulty Goods – you may notify us of damaged or faulty goods up to 14 days from receipt of your goods for a full refund. Once you contact us we will arrange collection of the damaged/faulty goods at our expense and, once returned to us, we will refund you in full no later than 30 days from receipt. There is no offer of replacement or alternative goods.
What is covered?
We give a warranty for the bike and accessories against defects in material or workmanship for a full year from the date of purchase. At our option we will repair or replace the defective product.
Parts: All parts are covered under this warranty.
Labour: All labor is covered under this warranty. In most cases there will be no delivery cost as a local cycle dealer can perform the repairs. The labour charge of the cycle service centre is reimbursed by us.
Shipping / Delivery: For the first 14 days, we will pay for shipping / delivery costs. After the first 14 days, we will only pay for the delivery charge to the customer and the customer pays the return delivery charge to us.
What is not covered?
This warranty does not cover damage caused by neglect, abuse or misuse and the warranty cannot be transferred.
How do I get Service?
1. If the cycle is new.
You should contact the supplier who will organise a replacement.
2. If the cycle is within the warranty period.
Contact us by email to request a warranty repair. Please provide your invoice number a description of the problem and contact details include name, address and phone number.
3. If the cycle is outside the warranty period.
Contact us by email for advice.
Contact Information
Email: TheGymGenie@Gmail.com