.
Please consider the environment before printing this document.
| English: |
Select your language from the drop-down box above. |
| German: |
Wählen Sie Ihre Sprache aus dem Dropdown-Feld oben aus. |
| Spanish: |
Seleccione su idioma en el cuadro desplegable de arriba. |
| French: |
Sélectionnez votre langue dans la liste déroulante ci-dessus. |
| Italian: |
Seleziona la tua lingua dalla casella a discesa in alto. |
| Dutch: |
Selecteer uw taal in de vervolgkeuzelijst hierboven. |
MotorVator Twin Drive Plus
Online User Manual

CAUTION:
READ THESE INSTRUCTIONS BEFORE USE
- People with certain medical conditions should consult their doctor before undertaking any form of exercise.
- If at any time you feel faint, light-headed or dizzy, please stop exercising immediately. You should also stop if you experience undue stress or pain at anytime. Contact your physician before continuing with your program.
- Follow your doctor’s recommendations in developing your personal fitness program.
- Know your limits and train within them. Always use common sense when exercising.
- Keep all children and pets away from this machine during use, as well as when this machine is unattended.
- Make sure that all the bolts are tight prior to each day’s use. Periodic maintenance is required on all exercise equipment to maintain good operating condition.
- Use the machine on a flat and level surface.
- Wear proper clothing, i.e. workout gear that allows free movement.
- Make sure that the power switch is set to OFF before connecting the DC cord.
- Before connecting the DC cord, check that the rated voltage shown on the plug matches your local voltage.
- Use only the supplied DC cord. Use with any other cords may result in the risk of fire.
- Note: Maximum weight support for this product is 65kgs/143lbs. Please note this does not refer to user weight only which is only restrictive to the chair used to sit on whilst using the product.
IMPORTANT
- Make sure that the power switch is set to OFF before connecting the DC cord.
- Before connecting the DC cord, check that the rated voltage shown on the plug matches your local voltage.
- Use only the supplied DC cord. Use with any other cords may result in the risk of fire.
ASSEMBLY INSTRUCTIONS:

Step 1. Place the bike on the non-slip mat and on a level surface.
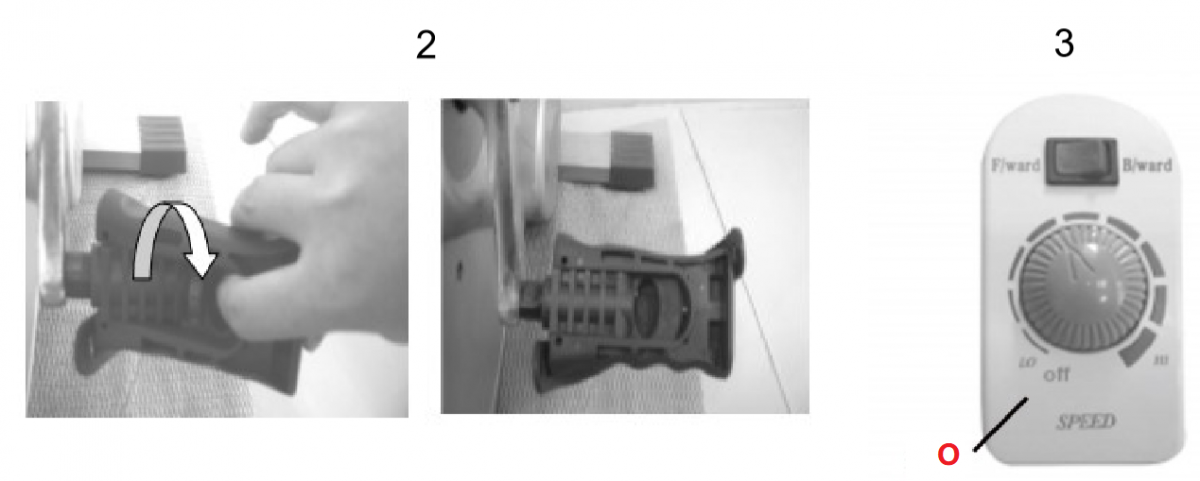
Step 2. Hold the end of the pedal, push in the locking lever (LL) (oval hinge) underneath the pedal and fold down until you hear a click sound.
Step 3. IMPORTANT: Make sure the controller is set to the OFF (O) position and if appropriate please follow any instructions on the power lead before plugging the unit into the electrical outlet.
Switch to ON when ready to operate. Adjust the speed by turning the grey knob to the level of your comfort.
The timer is a 15min/cycle. Switch to OFF when finished
For storage, unplug the unit and collapse the pedals.
To collapse the pedals, push in the locking lever (oval hinge) underneath the pedal and fold inward by 90 degrees. The pedal should be parallel with the machine.
IMPORTANT: After approximately 72 hours of use, it is recommended you check the Product and ensure all nuts and bolts are tightened including the pedals.
COMPUTER OPERATION / HOW TO USE:
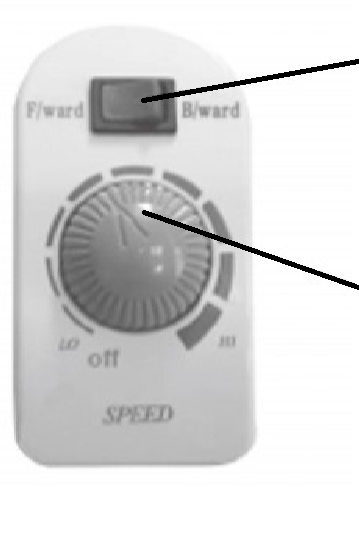 |
Switching the Pedal Direction
1. Forwards
2. Forwards / Reverse*
|
|
Speed Control Panel
Turn speed knob clockwise to increase speed
“Off” is to Switch power off
TIMER is present to 30 minutes, power will be turned off automatically when time is up. To reset the timer you must turn the switch from ON to OFF (as the switch is "ON" position) and then turn the switch to ON to restart the Bike
You Must turn Speed knob to “Off” position before adjusting Speed.
|
| (* Reverse direction only on certain models) |
For the first two weeks, you should begin with 5 –10 minutes once per day at low speed.
After the first two weeks, you can increase your time on the device to 15-20 minutes as you become more accustomed to the exercise, increase to the high setting once you have adapted to the device.
Always check with you physician before starting any new fitness regime.
Operate the computer by pressing the mode button.
1. To reset, hold the button down for 5 seconds.
2. To select other functions, press the mode button. Scroll until you select the desired function.

DISPLAY FUNCTIONS:
Scan – Reps – Timer – Total Reps – Calories – Distance.
Scan: Displays each function for 3 seconds.
Reps: Repetitions, each cycle counts as one repetition.
Timer: Counts up the time.
Total Reps: Accumulation of repetitions of all exercise sessions. The Total Reps can only be reset when the battery is removed
Calories: Estimated calories burned during exercise.
Distance: Estimated distance travelled during exercise.
TIMER SPECIFICATION:
KEY FUNCTIONS:
MODE: This key lets you select and lock on to a particular function.
OPERATION PROCEDURES:
1. AUTO ON/OFF
The timer turns on when any key is pressed or when an input from the cycle is detected.
The timer turns off automatically after a period of inactivity.
2. RESET
The timer can be reset to Zero by pressing the MODE key for 3 seconds.
3. SCAN or FUNCTION modes
SCAN mode will change between displaying Time, Repetitions, Calories etc. each readout will be displayed for a short period before moving on to the next. To set ,press mode button until the arrow on the display points to SCAN.
FUNCTION mode will display just your chosen function. To set press the MODE key until the arrow points to your desired function, once set this function will be displayed until manually changed or the timer reset.
FUNCTIONS:
1. TMR (TIMER) : Press the MODE key until arrow points towards TIME.
2. REPS (Repetitions): Each cycle counts as one repetition. Press the MODE key until arrow points to REPS.
3. CAL (CALORIES): Press the MODE key until arrow points towards CAL. TOTAL REPETITIONS: Press the MODE key until arrow points towards TOTAL REPS. The Total Reps count can only be reset when the battery is removed.
4. DISTANCE: The distance cycled will be displayed in kilometres by pressing MODE key until the arrow points to DIST.
5. SCAN : Automatically cycles the display to a different function every few seconds: REPS, TIMER, TOTAL REPS, CALORIES, and DISTANCE.
EXERCISES:
This device can be used for both upper and lower body exercise. As a lower body device, it works with a passive motion to increase tone of the quadriceps muscles (muscles in the thigh) and increases blood flow to the entire lower leg and foot. For upper body use, it performs as a resistance device allowing the user to use the pedals as hand grips to exercise the muscles of the arm (biceps, triceps, deltoids and the smaller muscles of the forearms).
Do not stand on the unit to exercise, only exercise at a seated position. Make sure the seat does not move or pivot.
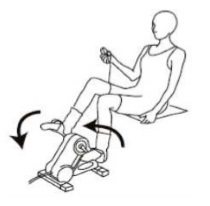 |
Leg Exercise
|
|
For use as a lower body device, secure the device on a non-slip surface prior to use and sit comfortably in a chair with the device directly in front of you so that the knee joint is not flexed less than 90 degrees. It is important that the user wears a rubber soled shoe when on this device so he/she does not slip off the pedals during the exercise.
|
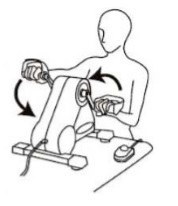 |
Arm Exercise
|
|
When using this device for upper body exercise, it should be placed directly in front of the user on a table top, and the user should be seated in a comfortable chair so that they can easily reach the pedals without hyperextension (over straightening) the elbow joint. This can be accomplished by either placing a seat cushion on top of the seat or by moving the device closer to the user.
|
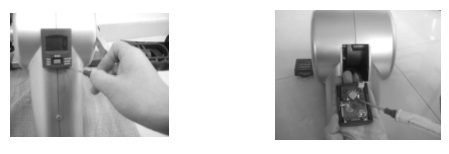
BATTERY REPLACEMENT:
When the display dims, replace with an LR44 button cell battery.
To replace the battery, remove the display by using a flat screwdriver. Remove the battery with the screwdriver. Replace with a new LR44 button cell battery.
CONTACT AND INFORMATION:
Support
Email: TheGymGenie@Gmail.Com
Warranty
12 months repair or replacement warranty
What is not covered?
This warranty does not cover damage caused by neglect, abuse or misuse and cannot be transferred, this product is not intended for commercial use this can result in additional damage which could negate your guarantee.
How to get Service?
If the cycle is new.
You should contact the supplier who will help you.
Contact us by email to request a warranty repair. Please provide your invoice number / order reference number and a description of the problem.
If the cycle is outside the warranty period we will always try to help
Contact us by email for details.
Email: TheGymGenie@Gmail.Com